I make my own comic art template, complete with a lettering guide. It’s easy to do. You can buy bristol board that have panel guidelines built into them, but they are usually on inferior bristol. I like to use 300 Strathmore smooth. And I have a printer that will take that through the manual feed. Here’s how I created my template.
Setup your comic art template in Adobe Illustrator
This part takes the most time, but it’s not difficult. Follow these steps:
- Create a new Artboard at 11” wide x 17” high with CMYK color.
- Select the Rectangle tool. Click anywhere on the Artboard to pull up the Rectangle Creation dialog box.
- Make a rectangle for 10” wide by 15” high.
- Use the alignment tools to center it on the Artboard and give it a stroke.
- Your stoke color should be set to 30% Cyan, 0 Magenta, 0 Yellow, and 0 K (Black).
- Create a two new layers.
- Go to your first layer and name it Base Box.
- Duplicate your layer twice. Name one 9 Panel Grid and the other 8 Panel Grid.
- Lock Base Box and 8 Panel Grid. Select the rectangle on your 9 Panel Grid layer.
- In your Menu, pull down to Object > Path > Split Into Grid…
- Create a grid with three rows and three columns. I’ll let you decide how much space between them there should be. Some people like everything to be equally distant. If you are a Hergé/Tin Tin fan, you may want to have more space between the rows than the columns, letting each tier stand on its own like a sentence for the visual paragraph you are producing on each page. It depends on your tastes.
- Lock that layer and unlock your 8 Panel Grid layer.
- Create a new grid, this time with 2 columns and 4 rows.
- Select the Pen tool and make hash marks outside of the Base Box rectangle where the new panel gutters meet.
- Delete the panels you have made. Now you have guides for an 8 Panel layout that you can pencil once you have printed your board.
- Create hash marks on the 9 Panel Grid layer, deleting the panels once you are done.
- Now you have a template that can make a standard 6, 8 and 9 panel layout for you comic page.
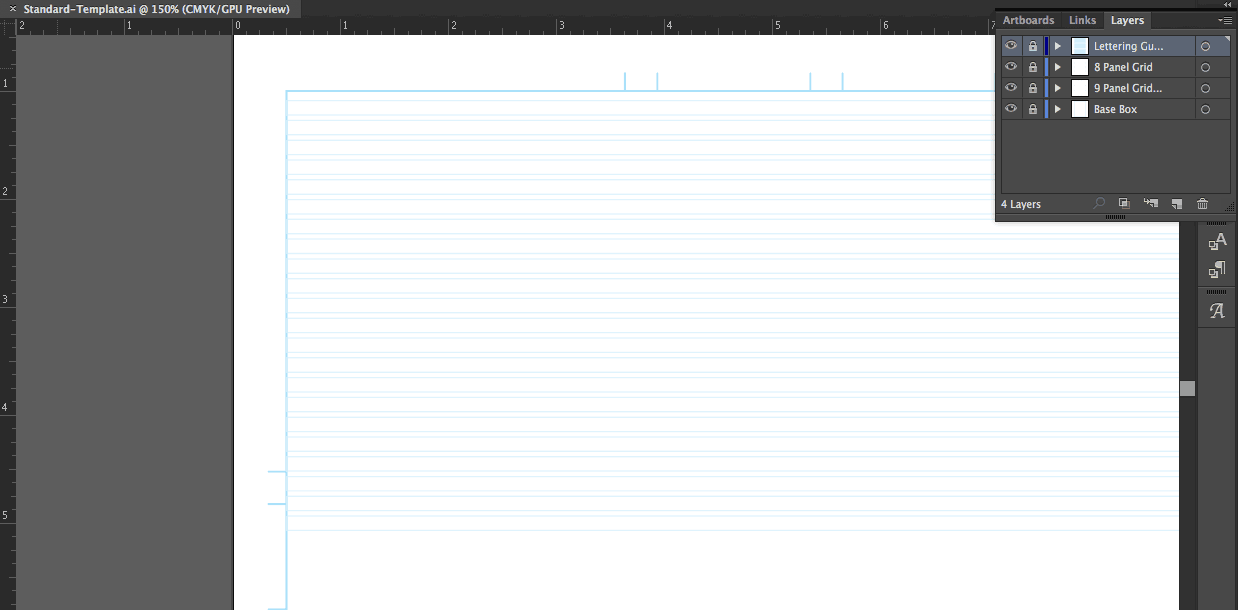
Create a Lettering Guide
We’ve created a template that will work for drawing panels, but let’s take it a bit further. Let’s create a Lettering guide on top of this so you can handletter your comic instead of using a font, or handlettering it with an Ames Lettering Guide.
- Create a new Layer called Lettering Guide.
- Select your Type Tool. Click and drag a box on your layer about the size of a panel.
- Go to lipsum.org and generate 5 paragraphs of Lorem Ipsum placeholder text. Paste that into your Type box you set. Font doesn’t matter. Don’t worry about it. We’re deleting it soon.
- Again, this is a matter of preference on how you set your type or how big you letter. According to Comicraft, they set word balloon fonts at 9.5 points with 10 point leading for full size art. I find that to be a little small. I think I set mine at 10 over 12 (10pt size, 12pt leading or 10/12). This is completley subjective. Play around to taste.
- Select the Rectangle tool again. Click and drag to create a rectangle around your type.
- Again, select the rectangle you just made and go to Object > Path > Split Into Grid…
- In the Grid dialog box, click the Preview option.
- Now, create as many rows as you have lines of type with 1 column. I used 22 rows. In the padding, play around until you match the leading of each line of type. In the end, you should have 22 rectangles that touch the top of the cap height and the bottom of the baseline for each line of type.
- Select your type and delete it. See. I told you.
- Now you have some skinny rectangles. Select them all and Group them together (Command/Control G).
- Set their strokes 0.5pts and make them 15% Cyan, 0 Magenta, 0 Yellow, and 0 K (Black).
- Click and drag your group to stretch them all the way across the page until they meet the other side of the Base Box. If you notice that the lines get thicker suddenly, hit Undo, then double click on the Scale tool. The Scale dialog box will pop up. Uncheck Scale Strokes & Effects on the Options section. Now stretch your box.
- Copy and paste your Group. Move it down to slightly below your middle tier. Repeat for your third tier.
Now you have a basic lettering guide. If you know your book is going to use an 8 panel grid, you can adjust your guide from the steps above. This works best with a 6 and 9 panel layout.
Congratulations! You now have your own comic art template! Print it onto your boards and save yourself some time. Or if you draw digitally, you can just import this into your program of choice and draw away.
I can’t find 11×17 boards. All I can find are 11X14 boards.
This happened to me. My local Dick Blick only carries pads of 11×14 Smooth Bristol. I’m too cheap to get the 18×24 pads and cut down. Huge waste of paper, too. So I get the 11×14 pads. I don’t know if there is a shortage of 11×17 pads or what. So what do I do with an 11×17 template?
I have a Brother Multifunction All-In-One Scanner, Copier, and Fax Printer. It’s great. I can print my boards with it and scan them at full Tabloid size also. But it’s old and finicky. It only prints from Photoshop for some reason. I could fix it, but I have 27 other better things to do with my time. Who the hell wants to fix print drivers for an evening? Not me. So I have to print my boards from Photoshop anyway. Which is perfect for resizing your template.
Resize your template in Photoshop
- Launch Photoshop. Create a new document for 11 inches by 14 inches.
- Go to File > Place Linked and select your Illustrator template as a Smart Object.
- Resize your template to fit your page.
- Save your document as a PSD.
- Print your page. Depending on your printer, it may say that the document is too big to print on your board. I just reduce it by 96% to fit on the page in the Print Dialog box. Works great.
The best part of resizing your template in Photoshop: you placed your Illustrator template as a Smart Object. Now, if you want to change your Illustrator template, those changes will be reflected in your Photoshop document. So you can constantly improve on your template to your heart’s content.
Download My Comic Art Template
You read through all of that, and now I’m going to give you my templates for free. I hope they are useful for you. I created them in Adobe Illustrator and Photoshop CC 2015, so you will probably need to be on that level for them to work. I hope that this helps you, and if anything, I hope you try to letter your work by hand. Please try it. Look at all the books at your comic shop and notice how they all sort of look the same. Stand out. Letter your comic by hand for a chage. It adds so much personality to your work. Sometimes you have to use a font, either from deadlines or for translations for international publication. But if you can, do it by hand. I want more handlettered work out in the world.

